Add a Web API Data Source
Web API Data Sources allow you to interact with remote RESTful Web APIs via NDL's Connect product, simplifying using Web APIs in your mobile apps.
Connect is able to read a Web API's definition file and create one or more tables which represent the Web API's operations and their request and response data items, so that you don't have to interpret the definition file within your mobile app. Deciphering Web API definitions and generating the tables is done using Connect within NDL's Hub Manager, another component of our Evolve digital transformation platform, and is done separately from creating your mobile apps. Interpreted Web APIs are stored by Connect and are then accessible to any users creating mobile apps or eForms with Evolve.
If you want to add a Web API Data Source to your mobile app, within App Studio you connect to Connect and view a list of Web APIs which have been interpreted by Connect. You can then select any operations that you want to use and import them into your Project as Data Sources. The Operations are presented to your app as one or more tables, with separate tables for request and response data. You treat these tables exactly as you would for a Database Data Source, including hiding data items you don't need in your app and mapping data items to Controls, making it very easy to incorporate accessing a Web API into your app.
At runtime, Connect acts as an intermediary between your app and the remote Web API. Your app can add records to the Web API request tables and, when you want to send the request to the remote Web API, forward them to Connect to be formatted appropriately and sent on to the Web API. Responses from the Web API are received by Connect, which converts the response data into the table format used in your app and then sent to the app, to be dealt with as required, e.g., to display the response data to the user. In this way, Connect does the hard work of handling the Web API request and response formatting for you, which can be extremely useful when dealing with complex Web API structures, leaving you to concentrate on producing apps which provide real benefits to your users.
For more information about Web API datasources, see Web API Data Sources.
To add a Web API operation as a Data Source:
-
Either
-
Right-click in the Data Sources Pane and then choose New Data Source → Web APIs
or
-
From the Project group on the Ribbon's Home tab, choose New Data Source → Web APIs.
-
-
If the following error message appears:
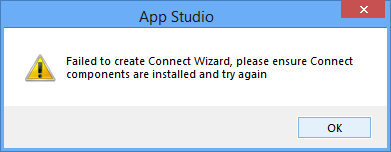
this means that the required Connect Wizard Extension software hasn't been installed on your development machine. You will need to install this software and then try again. For details of how to obtain and install the software, see Perform a New Install, Upgrade an Existing Version of Digitise Apps or Upgrade MX to Digitise Apps.
-
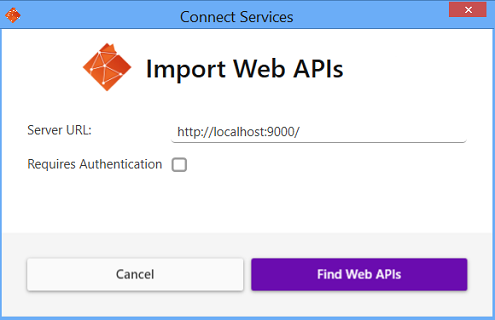
If the Connect Wizard Extension software is installed, the Connect Services dialog box will be displayed, showing the Import Web APIs page:
The Server URL provides details of how to connect to the Connect service which holds details about the Web API operation definitions you want to import into your Digitise Apps Project. The Connect service runs under a Hub agent, part of NDL's Hub product, and the address you enter here is the IP Address or machine name of the machine running the relevant Hub agent together with the port number assigned to Connect on that machine, in the format:
<URL>:<port number>
Whoever set up Hub and Connect should give you the required details to enter here, but, if you have access to Hub's Hub Manager software, you can find the appropriate machine name from within the Hub Manager Agents Screen, as shown below:
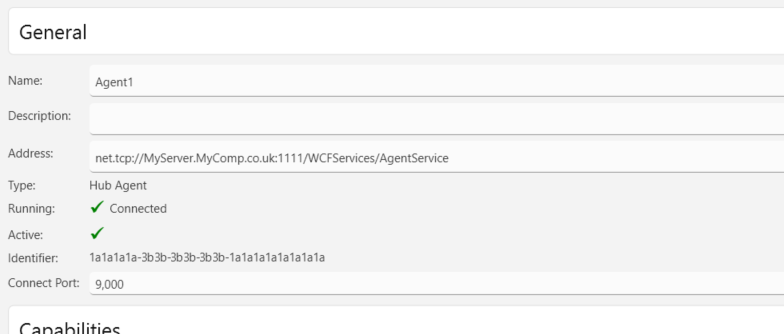
In the picture above, Agent1 is the Hub agent running the Connect service. The Address field provides the machine name, in this case MyServer.MyComp.co.uk. Take the machine name and add the correct scheme (e.g., http) to the beginning and the port number to the end to convert it to the correct address format, e.g. http://MyServer.MyComp.co.uk:9000.
Note that the port number included in the agent Address field needs to be replaced by the port number specified in the Connect Port field (without the comma), so using the picture above, the default agent's port number of 1111, would be replaced by 9000. See the Hub Manager Agents Screen topic within the separate Hub Online Help for more information about Hub agents.
If you are running App Studio on the same machine as that running the Hub agent, then you can use the URL http://localhost:9000/ as shown in the Connect Services dialog box above, although you will need to substitute the correct port number, if Connect has been configured to use a different port than 9000.
Back in the Connect Services dialog box, when you have finished, click on the Find Web APIs button to display the list of Web APIs available via the Connect service running on the specified server.
Alternatively, to abandon importing a Web API, click the Cancel button or the Close button,
, located in the top right-hand corner.
-
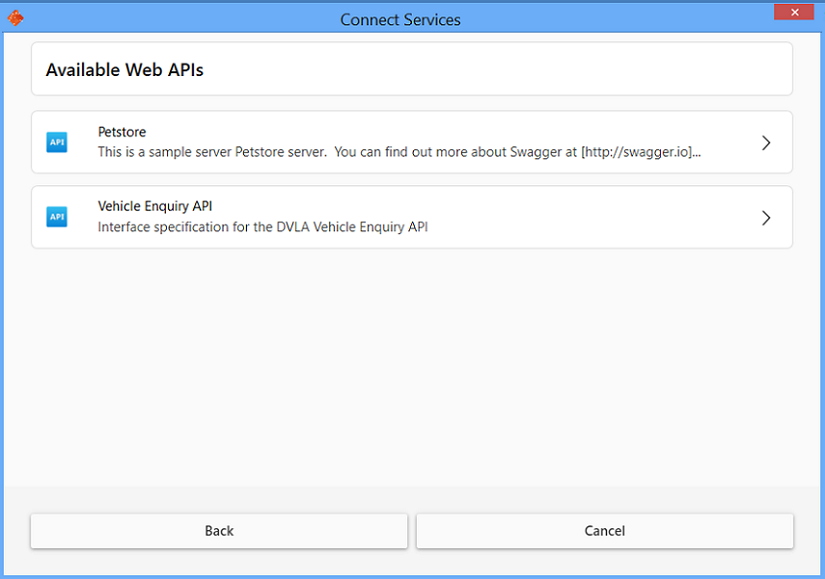
If you choose the Find Web APIs button, a list of the available Web APIs will be displayed, arranged alphabetically:
Each Web API listed displays a description of the API and its contents, if one was entered when the Web API was imported into Connect. If the description is too long to fit, an ellipsis (‘…’) will appear at the end of the row. Hovering your mouse cursor over the Web API name box displays a tooltip, which contains the full description.
You can return to the Import Web APIs page by clicking the Back button or cancel adding a Data Source by clicking the Cancel button or the dialog box's Close button,
, in the upper, right-hand corner.
Click on the Web API, whose operations you want to use in your app, in the list. You can click anywhere within the box containing the Web API's name.
-
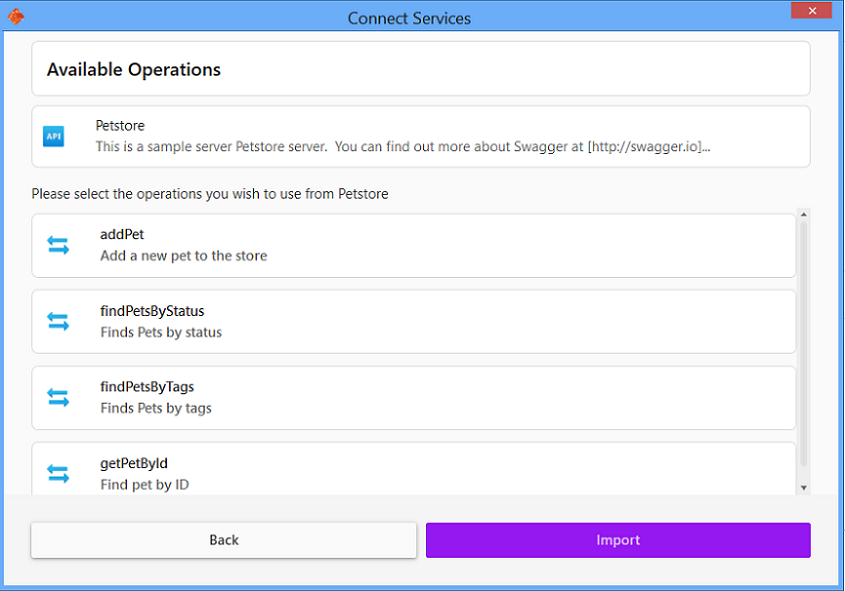
A list of the operations available in the selected Web API will be displayed:
The name of the Web API appears at the top of the screen, with a list of its available operations below it, in alphabetical order. Note that if an operation name contains any characters other than letters, underscores, hyphens, or numbers, these will be replaced with underscores. If the description for the Web API or any of its operations spans more than a single line, an ellipsis (‘…’) at the end of the description will indicate that more information is available. The additional information can be viewed by hovering your mouse cursor over the Web API or operation name box.
-
To create a Data Source in your Project for an operation, click on the operation's name to select it. The operation name box will change to purple. The Import button will also turn a darker shade of purple to indicate that one or more operations have been selected.
To import several operations at once, click on each of the required operations in the list in turn. To remove an operation from the selection, click the operation again. The item's background will turn from purple back to grey to show it has been deselected.
When you have chosen the operations you wish to import, press the Import button.
-
The imported operations will now be displayed as individual Data Sources in the Data Sources Pane.
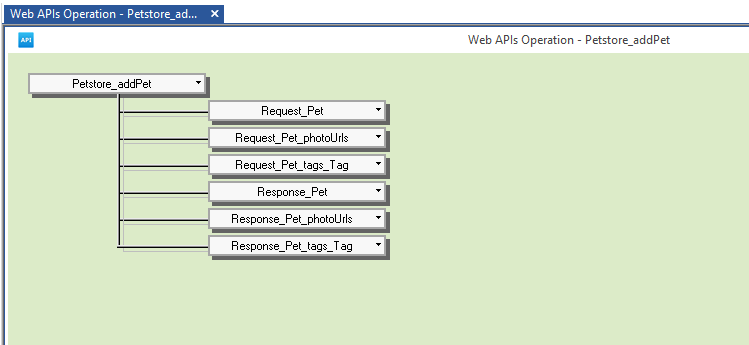
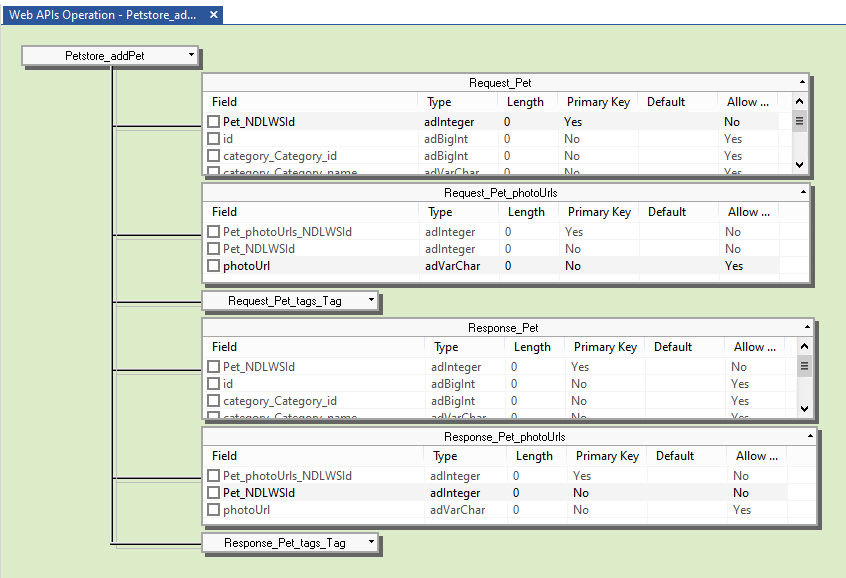
A new window will also appear in the Workspace for each new Data Source. Each window shows a, so-called, 'schema diagram' of the Data Source's tables. This is a sort of tree-view and looks something like this:
At the top of the tree, the 'Data Source node' displays a name combining the names of the Web API and the operation. Branching off below this are sub-nodes representing the various tables containing columns matching the data items in the operation's definition. There will generally be two sets of tables, one set covering the parameters which can be included in the request message, where the tables will be named Request_*, e.g., Request_Pet in the image above, and the second covering the data items which can be returned in the response message, tables labelled Response_*, e.g., Response_Pet in the image above. There may be one or more tables in each set, depending upon the data requirements defined for the request and response messages, and if an operation doesn't return a response, there will only be request tables.
Double-click on a table node to display the column fields within that table. Double-click on the caption bar at the top of the list to hide the fields again. Alternatively, you can toggle the display of the column fields by clicking on the Arrow symbol to the right of the table name or right-clicking on the table name and choosing Expand from the context menu.
-
You now need to tell your Project which column fields from the request and response tables you want to use in your app. Each column name has a check box to the left of it. Select the check box for a column you want to include in your Project and the Data Mapping dialog box will appear:
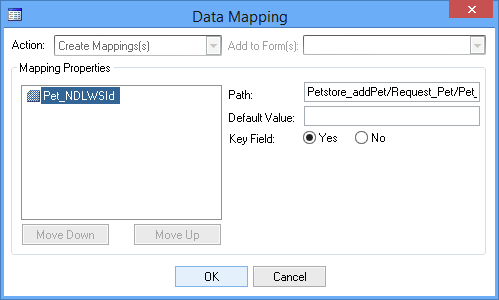
This dialog box allows you to specify a default value for this data item within your app and to specify whether this is a key field or not.
Click OK to add the data item or Cancel if you don't want to add it. If you choose OK the data item will be displayed in the Data Sources Pane below the operation. The data item trees displayed in the Data Sources Pane illustrate the local database tables that will store the data on your mobile devices at runtime.
You can map multiple data items within an individual table in one go. To do this, select the items in the standard manner by holding down the Ctrl or Shift keys whilst clicking on the required items (don't click on the check boxes) and then choose the Data Mappings button in the Data Source group on the Ribbon's Home tab. Choose Map Selected from the menu and the Data Mapping dialog box will be displayed with all your selected data items listed:
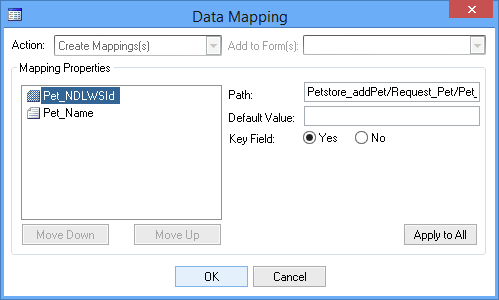
If you want to set default values or specify key fields, select a data item from the list and then edit the options for that item. If you want to apply the values specified in the selected item to all the other items listed in the dialog, click on the Apply to All button. You can also change the relative positions of the items using the Move Up and Move Down buttons.
The Data Mappings menu also allows you to delete the currently selected data items from your mapped list and to map or remove all data items in the current table. Alternatively, you can access these options by right-clicking on a table.
You don't have to map all the required data items at once. You can come back and add or delete mappings at any time. However, you won't be able to link a data item to a Control until you have mapped it as described above.
You can view and edit your data mappings by displaying the Data Sources Pane and double-clicking on the Data Source name, right-clicking on the name and choosing Open or, if displayed, clicking on the window or tab for the Data Source window in the Workspace.
You must remember to include any required parameters from the request tables but optional parameters and response data items can be omitted if you don't need them in your app.
When you expand a table node, you will see that the first column in the table is always a Primary Key ID column. This column is generated automatically and handled by your app but you must always include it in the Data Source.
The name of this field will be based on the table name combined with '_NDLWSId'. For example, the following picture shows the earlier schema diagram with some of the tables expanded:
As mentioned earlier, the first part of each table name indicates whether its data items are part of the request or response. The Primary key field is named after the table, minus the 'Request_' or 'Response_' part, combined with '_NDLWSId'. For example, the first table is called Request_Pet and its Primary Key is called Pet_NDLWSId. The values in the Primary Key fields are generated automatically and, at runtime, each record in the table will be given a different value in order to uniquely identify each record in the table. You must include the Primary key fields in your Data Sources.
Where the Request or Response consists of multiple tables, as in the diagram above, child tables will be linked to their parent tables by a Foreign Key field. This field will contain the Primary Key value from the corresponding parent record to link the two records together. For example, if you look at the second table in the diagram above, Request_Pet_photoUrls, you will see that the first column is its Primary Key field, Pet_photoUrls_NDLWSId, and the second column is named Pet_NDLWSId, which is the name of the Primary Key in the table above it. This field is used to link a record in the Request_Pet_photoUrls table to its corresponding record in the Request_Pet table. You must include these Foreign Key fields in your Data Source along with the Primary Key fields.
- Primary Key fields are automatically populated when a new record is created. Foreign Key fields, however, are not and you will need to manually populate the field(s) with appropriate values either within a Script or by using an output mapped Control.
- These Primary-Foreign Key relationships are used internally to keep track of related data tables on the local device and aren't forwarded to the Web API.
-
Once you have added a Data Source, you may need to edit its Properties in order to get your app to work as required. You can display the Properties for any node or data item in the Data Sources Pane tree view, by clicking on the required node or data item. The Properties for the selected item will be displayed in the Properties Pane. Editable Properties are displayed in black. Those which can't be edited are displayed in grey. The main Properties are:
 Data Source Nodes
Name
The name by which this Data Source will be known in your Project. A default name will automatically be assigned when you import the operation, but you can change it here if you want to.
Operation Id
A unique identifier, which identifies this operation to Connect. The value is assigned automatically when the operation's definition is imported and shouldn't generally be changed.
Note, however, that if the Web API definition were to be deleted and re-imported in Hub Manager, this ID value would change. If there were no other changes to the imported definition, you could obtain the new ID and enter it here, so that your Project would be using the latest definition without you having to delete and recreate the Data Source.
You can obtain an operation's ID from within Hub Manager, a separate component within NDL's digital transformation platform, Evolve:
-
In Hub Manager, from the Home page, click on the Connect button to display the list of imported Web API definitions.
-
Click on the required Web API in the list. The list of operations available for the selected Web API will be displayed.
-
Click on the logged-in user name in the top right-hand corner of the window and then choose Settings from the menu displayed.
-
Check the Advanced Mode setting is enabled (slider is to the right). If not, click on the slider to move it to the right and enable the option.
-
Close the Settings dialog by clicking on the 'x' button in the top right-hand corner of the dialog.
-
Click anywhere in the window, outside of the menu, to close the menu and return to the list of operations for your selected Web API.
-
Locate the relevant operation in the list and choose the More button,
 , at the right-hand of its row. Choose Edit.
 -
The Edit Operation dialog box will appear and the operation's ID will be displayed at the top of the dialog below the Title Bar.
-
If you have Hub Manager and App Studio running on the same machine, you can copy and paste the value into the Operation Id field. Alternatively, make a note of the ID and then type it in to the Operation Id later.
-
If you don't need to run Hub Manager in Advanced Mode, you can now disable the option from the Settings dialog.
URL
The URL provides the address of the Connect service responsible for communications with this operation. A Connect service runs under a Hub agent, part of NDL's Hub product, and the address you enter here is the IP Address or machine name of the machine running the relevant Hub agent together with the port number assigned to Connect on that machine, in the format:
<URL>:<port number>
Whoever set up Hub and Connect should give you the required details to enter here, but, if you have access to Hub's Hub Manager software, you can find the appropriate machine name from within the Hub Manager Agents Screen, as shown below:

In the picture above, Agent1 is the Hub agent running the Connect service. The Address field provides the machine name, in this case MyServer.MyComp.co.uk. Take the machine name and add the correct scheme to the beginning and the port number to the end to convert it to the correct address format, e.g. http://MyServer.MyComp.co.uk:9000.
Note that the port number included in the agent Address field needs to be replaced by the port number specified in the Connect Port field (without the comma), so using the picture above, the default agent's port number of 1111, would be replaced by 9000. See the Hub Manager Agents Screen topic within the separate Hub Online Help for more information about Hub agents.
If Connect will be running on the same machine as your Digitise Apps Server, you can use the URL http://localhost:9000/, although you will need to substitute the correct port number, if Connect has been configured to use a port number other than 9000.
Username and Password
Allows you to specify a user name and password to be used to authenticate you to the Connect service. Leave blank to use the credentials of the user under which the App Server service is running.
Overwrite Server Settings
For each Digitise app you publish to the App Server, there are a number of Properties relating to each Data Source which can be specified within App Manager. These Properties include the connection details and any username and password required to access the remote data source.
These Properties can be entered manually within App Manager or copied into App Manager, when the Project is published to the App Server, from the equivalent Properties specified within App Studio. Any values stored within App Manager will be used in preference to the values entered within App Studio. This allows you to modify some essential Properties for Data Sources without having to edit and republish your Project, e.g. to move temporarily from a live to a test data source. The Properties are specified within App Manager using the Data Sources button under the Properties tab for individual published apps.
The Overwrite Server Settings Property within App Studio allows you to specify whether you want the App Manager Data Source Properties to be overwritten by the equivalent values within a Project when you publish the Project to the App Server.
You specify a default value for this Property under the Project Properties but you can change this for each individual Data Source within the Project, if required.
Under the Project Properties, set this Property to True if you want the default action to be to overwrite the App Manager settings when you publish the Project or False if you want the default action to be not to overwrite them.
Under each individual Data Source, the default value for the Overwrite Server Settings Property is Default, which means it will use the value specified within the Project Properties. To use a different setting for an individual Data Source than the default setting, under the particular Data Source's Properties, change the Overwrite Server Settings Property's value from Default to True if you want the App Manager settings to be overwritten or False to retain the App Manager settings.
 Request/Response Table Node
Name
Specifies the name of this table in the local database on the device. The name is assigned automatically and cannot be changed.
Device Database
Allows you to specify the local database on the mobile device in which you want your app to store data records for this table. Leave at Default if you want to use the default database to store this data.
Specify the name of the database file to use without the file extension. Note that for that Android, Apple and Windows Universal Platforms, you cannot include a path with the file name.
You can share a database between different apps by prefixing the database name with %SHARE%\, e.g. %SHARE%\MyAppData.
Device Table
Name of the table in the local database on the mobile device in which data records for this Data Source will be stored. This Property will be populated automatically when the Data Source is created but you can change it here if you want to.
Timeout
Number of seconds the Digitise Apps Client will wait for data to start being downloaded when a data download is requested at runtime.
Storage Mode
Select Disk to retain data in the Digitise Apps Client's local database, Memory for temporary data. On Android, Apple and Windows Universal Platforms, data is always stored on 'disk'.
Mapping,
Modify Action Online,
Modify Action Offline,
ObjectId and
Sequence Number
These Properties are not relevant for Web API Datasources and can be ignored.
Sync Direction
This is automatically set to Up for a request table and Down for a response table and cannot be changed.
 Data Item Nodes
Data Mapping Category
Mapping
The name of the column for this data item within the local database on the device. This name is generated automatically when the Data Source is created but can be changed here if you want to.
Storage Category
Allows you to choose where large binary data items, such as photographs and videos, should be stored locally on a mobile device. It allows you to choose between storing these items in the local database tables or in files in the local file system, which provides faster performance at runtime. This option applies to items which are downloaded from a remote data source or created on the device within a Digitise app, e.g. when taking a photo or recording a video from within the app. Videos must be stored in the local file system and not in the database.
This Property is available at the data item level, so you can choose where to store the contents of each column individually.
The Property has the following possible values:
Database
Data items will be stored in the local database. This is the default value.
File
Data items will be stored in files rather than in the local database.
To store items in files rather than the local database, your Database Data Source must still have a suitable data item, i.e. a data item with data type such as image or varbinary. You then need to set the data item's Mode Property to File. When you need to refer to this data item, e.g. within your Scripts or to create input and output mappings, you refer to the Data Source data item as normal and Digitise Apps keeps track of the file(s) used to store your photos or video(s), so you don't need to worry about file names or which item is stored in which file.
- When using the TakeVideo Scripting Method to record videos within an app, the Data field used to store the captured videos must be configured to store its data to file, otherwise an error message will be displayed when the user attempts to save their video.
The files are stored in the same location as the app's database so are sandboxed on Android and iOS devices but can be optionally encrypted for greater security if required (see below). You can also specify how the contents should be encrypted in transit when uploaded from the device (see below).
When you save data items to file rather than the local database, you must use the Synchronise Scripting Method to transfer data between the client and the remote data source, other data transfer Methods don't work with file data. The file contents are transferred, in both directions, as raw binary data.
- File storage is designed to be used with binary data, such as image and varbinary data types, for handling large data items such as images and videos or even pdf files. For smaller data items, such as text strings, numbers, dates etc., and images, videos and pdfs less than 0.5 MB in size, storing the data in the local database will be more efficient and quicker. If you attempt to store non-binary data in a file, the behaviour is undefined.
The rest of the Properties for this data item will vary, depending upon your choice here.
Transfer Encryption Mode - This Property is only displayed if you have selected File in the Mode Property above.
Determines whether the contents of the file will be encrypted before being uploaded to the remote data source. Possible values are:
Default
The data item will be uploaded to the remote Web API using the same encryption settings as all other data. The encryption is determined by the Server Properties in App Manager.
Passthrough
If the file is not encrypted (see under File Attributes Category below), it will be uploaded to the remote Web API using the same encryption settings as all other data – as specified in the Server Properties in App Manager.
If the file is encrypted, the file will be uploaded as it is and will be decrypted by the App Server. This uses a less secure encryption algorithm than using the Server Properties encryption (although it still uses an AES 256-bit encryption cipher) but may improve the speed of transfer.
Note that using the optional encryption may have an effect on performance at runtime as the files will need to be encrypted and decrypted.
Database Attributes Category
Primary Key - This Property is only displayed if you have selected Database in the Mode Property above.
Set this Property to True if this data item is the Primary Key or part of a combination of columns making up the Primary Key for this Data Source. The Primary Key must be a unique value for each record.
Otherwise it should be set to False.
Default - This Property is only displayed if you have selected Database in the Mode Property above.
Default value for this item.
Length - This Property is only displayed if you have selected Database in the Mode Property above.
Length of data, where applicable.
Allow Null - This Property is only displayed if you have selected Database in the Mode Property above.
If this data item can contain Null values, this Property should be set to True, otherwise it should be set to False.
For a request parameter, the value of this Property will depend upon whether the Web API allows Null values to be sent to it and for a response data item it will depend upon whether the Web API can send Null values in the response for this data item.
Read-Only - This Property is only displayed if you have selected Database in the Mode Property above.
If set to True the value in this data item cannot be updated in an existing record on the mobile device. A value can only be entered in a new record.
By default, the Property is set to False, which means the data item can be updated in an existing record.
For Primary key fields, you may need to set this Property to True, if you experience problems when the Property is set to False. For all other fields, we recommend keeping the default value of False.
Ignore Invalid Control Characters - This Property is only displayed if you have selected Database in the Mode Property above.
If set to True, any unrecognised control characters will be ignored when displayed on your mobile devices.
SQL Type Override - This Property is only displayed if you have selected Database in the Mode Property above.
Allows you to specify the SQL data type to be used for this data item in the local database on the mobile device instead of the default data type assigned when the Data Source was created.
Auto - This Property is only displayed if you have selected Database in the Mode Property above.
Allows you to automatically generate unique values for a data column when a record is created using the CreateRecord Method. You can use this option to populate an Identity field or generate a unique GUID value.
The default value is None, which means this data item will not be automatically assigned a value when the record is created.
Select GUID to enter a unique GUID value, in the form:
00000000-0000-0000-0000-000000000000
Note that the data column must have a GUID or string data type.
Select Identity to enter a unique Identity value. Selecting Identity displays two further Properties:
Identity Seed
Provides the starting numeric value.
Identity Increment
Specifies the amount to increment or decrease the Seed or last used value to generate the number when a new record is created.
Note that GUID and Identity values are only guaranteed to be unique within the local database table.
Foreign Key - This Property is only displayed if you have selected Database in the Mode Property above.
Indicates whether this data item is a Foreign Key, i.e. its contents will match with a value in a Primary Key field in another table. This Property should be automatically set when you create the Data Source.
The value of this Property specifies the table and data column containing the Primary Key to which this data item relates.
If the data item doesn't have this Property set as a Foreign Key when it should, you can manually enter the Digitise Apps Data Source Table and data item in the format: <table>.<dataitem>.
- Primary Key fields are automatically populated when a new record is created. Foreign Key fields, however, are not and you will need to manually populate the field(s) with appropriate values either within a Script or by using an output mapped Control.
SQL INSERT Override - This Property is only displayed if you have selected Database in the Mode Property above.
This option is not relevant when using a Web API Data Source.
SQL UPDATE Override - This Property is only displayed if you have selected Database in the Mode Property above.
This option is not relevant when using a Web API Data Source.
SQL SELECT Override - This Property is only displayed if you have selected Database in the Mode Property above.
This option is not relevant when using a Web API Data Source.
File Attributes Category
Encrypt on device - This Property is only displayed if you have selected File in the Mode Property above.
Set this Property to True to encrypt the file using an AES 256-bit encryption cipher. This is the default setting. Set it to False if you don't need to encrypt the file.
-
- If, after publishing an app, you want to change some of the above Properties, such as the Connection String, Username, Password and Timeout values, for example to change between live and test data sources, you can't currently edit these Properties in App Manager as you can with other Data Sources. With Web API Data Sources, you will need to edit the app in App Studio, edit the Properties, republish the app and redeploy it to all relevant devices. You can, however, change the URL programmatically within your Scripts, if you need or want to.
